Tuesday, November 13, 2012
MY Bursa Watch, release 1 is now in the Windows Store
After 1 month of work, finally my Windows app is up in Store.
It's a financial app, named MY Bursa Watch.
If you are in Windows Store, you can find it in:
1) Finance>New release
2) Use this link to if you are using internet browser:
http://apps.microsoft.com/webpdp/app/my-bursa-watch/d28a37db-7cb1-4c87-bec1-88f11ca5e314
In this version, the following features are included:
1) KLSE index (delay by 15 minutes)
2) Top 15 active counters, gainers and losers
3) Refresh
4) Detailed info on selected stock
More in coming version:
1) Portfolio/Watchlist
2) News
Monday, November 5, 2012
Privacy Statement (MY Bursa Watch)
I - Respect of Customer's Right to Privacy
I realizes that the trust of our customers is our most valuable asset. I recognize that customers expect a high level of privacy and security for their personal and financial affairs. I maintain rigorous standards and procedures in order to safeguard sensitive information entrusted to us and prevent misuse of this information.
II - Information
The app do NOT collect information for any business purposes.
Sunday, November 4, 2012
WinRT: Deploy a win8 app locally (Sideloading)
After 3 weeks of long development (using spare times from after-working-hours, and weekend), the Windows 8 app that I've developed is almost done with some basic features.
Before submitting the app, the package has to be tested. To run it locally without the debugger's help, it's not so straightforward.
Here're the steps needed:
1) Start package creation using Visual Studio.
2) Sign-in if needed, not needed since I only want to test locally.
3) Then configure the package.
4) Done, and these are all the files created. It comes with a cert.
5) OK, you think you can start installing the cert, by right-click it and install.
6) "Certificate Import Wizard" prompted. Just install in local and next..., until suceess.
7) Then start the PowerShell, run as admin with this command:
a) Windows+R
b) Start-Process powershell -Verb runAs
8) Change the directory if needed, then
a) change directory: cd XXX
b) deploy package: add-appxpackage YYY.appx
where XXX (directory), YYY.appx (executable file) created in step (4).
But not working :(
9) After goggling, we have more job to do.
10) Now start the Microsoft Management Console, type:
a) Windows+R
Before submitting the app, the package has to be tested. To run it locally without the debugger's help, it's not so straightforward.
Here're the steps needed:
1) Start package creation using Visual Studio.
2) Sign-in if needed, not needed since I only want to test locally.
3) Then configure the package.
4) Done, and these are all the files created. It comes with a cert.
5) OK, you think you can start installing the cert, by right-click it and install.
6) "Certificate Import Wizard" prompted. Just install in local and next..., until suceess.
7) Then start the PowerShell, run as admin with this command:
a) Windows+R
b) Start-Process powershell -Verb runAs
8) Change the directory if needed, then
a) change directory: cd XXX
b) deploy package: add-appxpackage YYY.appx
where XXX (directory), YYY.appx (executable file) created in step (4).
But not working :(
9) After goggling, we have more job to do.
10) Now start the Microsoft Management Console, type:
a) Windows+R
b) mmc
10) You might need to learn 'How to Use the Certificates Console'
11) Use the import function and you will be greeted by wizard again.
12) Browse to the cert (.cer) created by Visual Studio previously.
13) then click 'Next' all the way till success. You cert is in the root.
14) Back to power-shell again. Deploy package with this command: add-appxpackage YYY.appx
15) VoilĂ !
16) Sometimes, your deployment might fail. From here:
ERROR_DELETING_EXISTING_APPLICATIONDATA_STORE_FAILED : 0x80073D05
17) One of the possibilities is simulator (or my app locked the resource??) Just turn-off the simulator (thru' "Task Manager") and re-deploy will do.
10) You might need to learn 'How to Use the Certificates Console'
11) Use the import function and you will be greeted by wizard again.
12) Browse to the cert (.cer) created by Visual Studio previously.
13) then click 'Next' all the way till success. You cert is in the root.
14) Back to power-shell again. Deploy package with this command: add-appxpackage YYY.appx
15) VoilĂ !
16) Sometimes, your deployment might fail. From here:
ERROR_DELETING_EXISTING_APPLICATIONDATA_STORE_FAILED : 0x80073D05
17) One of the possibilities is simulator (or my app locked the resource??) Just turn-off the simulator (thru' "Task Manager") and re-deploy will do.
I'm back....
After a long period of stop blogging, I'm back.
With the success of Apple AppStore & Goole Play, Microsoft has launched it's version of app store. As a developer, more skill-sets are required to survive (of course, if I can earn some side-income from advertising is even better) and thus dive into Windows 8 app development.
To me, in order to attract more users to download, one have to consider 2 things:
1) useful
2) creativeness
Since the later one is not easy, so I start the first with what happen around me. Wait for more...
With the success of Apple AppStore & Goole Play, Microsoft has launched it's version of app store. As a developer, more skill-sets are required to survive (of course, if I can earn some side-income from advertising is even better) and thus dive into Windows 8 app development.
To me, in order to attract more users to download, one have to consider 2 things:
1) useful
2) creativeness
Since the later one is not easy, so I start the first with what happen around me. Wait for more...
Tuesday, August 9, 2011
Creating Linked-server in MSSQL
I come across a situation where I need to import the data from one instance to another, in MSSQL. So, I add the steps here to see it might help.
1) At source DB where we want to retrieve the data, create a new login account, eg. "test" with password "123".
2) Use the neccesary authetication, choose to untick "Enforce password policy" for our testing purpose.
3) If the db name in source DB is called "testing", maps the test account "test" to this db, with appropriate schema. In this case, it's "dbo". Add the role as "db_datareader" as well.
4) At destination DB where we want to store the data, create a same new login account created in step (1), eg. "test" with password "123", using SA account.
5) Use the neccesary authetication, choose to untick "Enforce password policy" for our testing purpose.
6) If the db name in destination DB is called "testDB", maps the test account "test" to this db, with appropriate schema. In this case, it's "dbo".
7) Add a linked-server in destination DB, you can either use SQL script or GUI.
8) You can verify the available linked-server in the destination DB, thru' Catalog Views: sys.servers
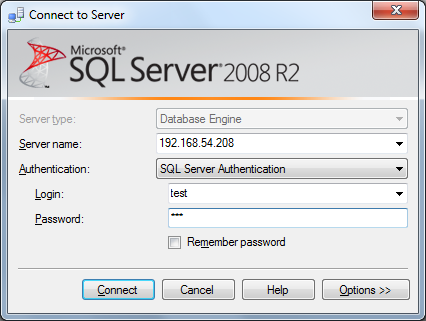
9) Now, log-in as "test" user.
10) So, you should be able to query the source DB data by using a fully-qualified name.
1) At source DB where we want to retrieve the data, create a new login account, eg. "test" with password "123".
2) Use the neccesary authetication, choose to untick "Enforce password policy" for our testing purpose.
3) If the db name in source DB is called "testing", maps the test account "test" to this db, with appropriate schema. In this case, it's "dbo". Add the role as "db_datareader" as well.
4) At destination DB where we want to store the data, create a same new login account created in step (1), eg. "test" with password "123", using SA account.
5) Use the neccesary authetication, choose to untick "Enforce password policy" for our testing purpose.
6) If the db name in destination DB is called "testDB", maps the test account "test" to this db, with appropriate schema. In this case, it's "dbo".
7) Add a linked-server in destination DB, you can either use SQL script or GUI.
8) You can verify the available linked-server in the destination DB, thru' Catalog Views: sys.servers
9) Now, log-in as "test" user.
10) So, you should be able to query the source DB data by using a fully-qualified name.
Subscribe to:
Posts (Atom)